Some Reminders
If we said it once, we've said it a thousand times...
One more time, before we start, in case you missed all of these vital points:
- DO NOT SORT WITH LOOT UNTIL DIRECTED.
- LOOT will not sort the Load Order correctly until you complete the installation.
- LOOT will report errors that may not have been resolved yet.
- DO NOT DEVIATE FROM THE GUIDE INSTRUCTIONS.
- Trust the guide's instructions. Don't add or subtract from the Guide. Even things you wouldn't think could cause problems... can.
- FOR THE LOVE OF TALOS (or your other chosen Aedra/Daedra/Spectral Entity), READ THE NEXUS MOD PAGES.
- Many "bug" reports we have received resulted from players not being aware of the changes the guide made to the game. Changes that were fully intended. Yes, that's a LOT of mod pages, and no, we don't expect you to remember every single word, but we do expect that you be responsible with your own computer system and know exactly what you are doing by downloading and installing it.
- Follow the guide’s installation instructions and go over the mod pages if they differ. Any requirements that the mod page lists will be covered later in the guide or by an alternative mod.
- REFER TO THE COMMON TASKS PAGE FOR:
 EXTRACT THE BSA Instructions
 CREATION KIT RESAVE Instructions
 CAO Instructions
- Mod Installation Advice
Keep in mind that this guide will provide a large number of custom-made patches to make the several hundred mods you will be installing play together nicely. Attention to detail is crucial if you want this to come out the way it is supposed to. Take breaks. Walk away. Don't race to the finish line, but set a nice and manageable pace. Take naps. SLEEP. Whatever it takes, make sure you can pay attention to every single word.
And on that note...
Here... We... Go!
Windows File Extensions
Making the unseen seen
First things first, we need to make sure Windows file extensions are visible.
- Open Windows File Explorer.
- In the top title bar, select the View tab.
- Make sure 'File name extensions' is checked.
- Close the window.
The Windows Page File
Windows: Making Things Difficult Since Forever
The Guide (and Skyrim in general, really) uses a lot of memory and is very CPU intensive. We want to be sure that Windows doesn't try to make things more difficult for you to run the guide as smoothly and easily as possible. To do this, we are going to ensure that your system is properly set up to deal with the Page File requirements.
Older SSD drives would sometimes disable paging on the non-system drives to prevent too much writing to the drive. While newer SSDs no longer do this, it is still important to ensure that the Paging system is both enabled and given good settings. If it is disabled on the drive Skyrim or MO2 is installed on, you can run out of dedicated video memory, which can cause random-seeming Crashes to Desktop (CTD) when transitioning between in-game regions or cell transitions.
Follow the instructions below to ensure you have Paging both enabled and setup properly:
- Press Windows + R on your keyboard.
- Type in
sysdm.cpl ,3and then press ENTER. - In the window that appears, find the "Performance" section and click on "Settings".
- Select the "Advanced" tab at the top of the window.
- Find the "Virtual Memory" section and click on "Change..."
- Find the "Automatically Manage Paging File Size for All Drives". DISABLE this setting.
- If you have more than one drive, you may want to enable this setting for a drive that does not have MO2 or Skyrim installed on it as a backup. It should have a decent amount of free space on this drive... at least 15GB. You can set this drive to use "System Managed Size".
- For the drive or drives that contain MO2 and Skyrim, set to "System Managed"
Windows 11 Smart App Control
Windows: To Smart For Its Own Good.
Windows 11 Smart App Control (SAC) is a new security feature introduced in Windows 11 version 22H2 that proactively blocks untrusted or potentially malicious applications. Unlike traditional antivirus software, which scans for threats after they land, SAC evaluates apps they run using cloud-based AI and digital signature checks.
However, this feature will interfere with some of the tools the guide uses, so we recommend turning this feature off while installing the guide:
- Open Settings the select Privacy & security.
- Select Windows Security.
- Select App & browser control.
- In the new windows, select Smart App Control settings.
- Toggle OFF.
Shader Cache (NVIDIA Users Only)
Seek The Shade and pay in Cache!
For NVIDIA GPU users, it is recommended to boost the size of your shader cache. These settings have been shown to improve stability, and while they may not be entirely necessary, they are still recommended.
- In order to adjust your Shader Cache settings, follow the steps below.
- Right-click on your desktop and select NVIDIA App.
- Navigate and click Graphics.
- Then click on the Global Settings tab, scroll down until you see Shader Cache Size.
- Double click to the right of Shader Cache Size and from the drop-down menu select 10 GB.
- Click Apply in the bottom right-hand corner.
- Exit out of the NVIDIA App.
The Web Browser
Your Browser May Be Lying To You...
Normally, we don't want to dictate your entire experience of surfing the internet, but in this case, we have to make an exception. For reasons that are still unknown to us (and believe us, we've been investigating...) we've noticed that any web browser that is Chromium based (Chrome, Opera, Brave, Edge, etc.) create a problem when using this wonderful site that you are looking at right this very minute.
Specifically, these browsers do not consistently display FOMOD options correctly on the screen, which can lead to a lot of confusion, incorrect mod installation, furious questions in the discord, mutes, bans, death, and other general unpleasantness.
For this reason...
"We HIGHLY recommend NOT using any Chromium-Based browser when installing the Guide. We instead recommend (at least for the time being) that you use Firefox, which we know for certain will display the FOMODs and other important information correctly."
So go do that. Install Firefox, even if you plan to never use it for anything else ever in all of eternity. Just for this. Trust us, it will help. When you're done, come back here (in Firefox!) and we'll be waiting to get started.
General Utilities
Preventing Major Mayhem
7-Zip
7-Zip is a free, multi-format compression program capable of handling virtually any archive.
Nexus Mods Sensible Archive - Firefox Extension Addon
Download mods directly from the Nexus Mods Archive, instead of having to extract the code from HTML and manually put it into a link.
- Make Sure you have installed the Firefox Web browser.
- Press the Add to Firefox Button.
- In the pop-up, click the Add button.
- Then click OK.
- Exit and restart Firefox.
.NetFramework
.NET is a free, cross-platform, open-source developer platform for building many different types of applications. This is required for Synthesis and Scrambled Bugs to function properly.
Microsoft Visual C++ Redistributable for Visual Studio 2015, 2017, 2019, and 2022
The Visual C++ Redistributable installs Microsoft C and C++ (MSVC) runtime libraries. These libraries are required by many applications built by using Microsoft C and C++ tools. This is required for Mod Organizer 2 and LOOT to function properly.
Official Bethesda Content
Complete With Official Bethesda Bugs
Skyrim Special Edition
Steam Overlay
The Steam Overlay is known to cause issues while playing Skyrim Special Edition, and you are advised to disable it; to do this perform the following:
- Load Steam.
- In the toolbar at the top of the window, click Steam.
- In the dropdown menu, click Settings.
- Then in the popup box select the In-Game menu item.
- Uncheck Enable the Steam overlay while in-game.
Alternatively, if you would just like to disable the Overlay for Skyrim Special Edition you may:
- Load Steam.
- Click LIBRARY.
- In your games list, look for The Elder Scrolls V: Skyrim Special Edition and right-click on it.
- In the dropdown menu, click Properties.
- Then, in the popup box, uncheck Enable the Steam Overlay while in-game.
Update Proofing Skyrim
Bethesda regularly (roughly every three months) updates some of the base Skyrim files in support of their Creation Club content. This means that SKSE (and a bunch of mods that use it) will no longer function. In order to prevent STEAM from updating these files, it is required that you make the following selections:
- In STEAM, right-click on The Elder Scrolls V: Skyrim Special Edition.
- In the menu that appears, click on Properties.
- In the pop-up window, select the Updates tab.
- In the selection box under "Automatic Updates", select "Wait until I launch the game."
- Close the window.
Despite the wording, no update to the game will occur UNLESS you launch the game via STEAM. Since we will be launching Skyrim via MO2 and the SKSE launcher, no trigger event will occur, and your Skyrim install will remain in the same state as it currently is until you force the update yourself.
In the event that it still updates, it is possible to roll back to an earlier version. Rather than detailing this procedure, we recommend reading this article for details on how to do so.
Configure Skyrim
Before we can start doing any modding, we need to set up Skyrim Special Edition, so we have a starting base configuration.
Start The Elder Scrolls V: Skyrim Special Edition through the Steam context menu to open the default Skyrim Special Edition launcher.
- Click Options.
- Click the Ultra button.
- Set Aspect Ratio and Resolution in the drop-down box. These should be set to your monitors' optimal resolution.
- Set Antialiasing to Off in the drop-down box. This is in preparation for the ENB Install.
- Ensure that Windowed Mode is unchecked.
- Click the OK button to close and save.
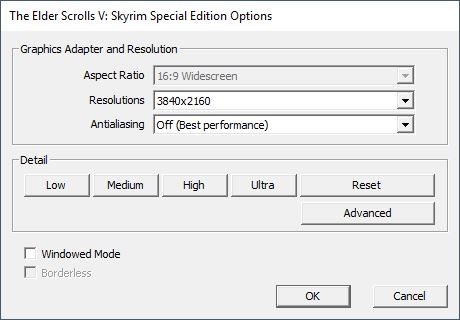
Click the Ultra button.
Set the Aspect Ratio and Resolutions to your monitors' optimal settings.
Set Antialiasing to Off.
Ensure Windowed Mode is unchecked.
Skyrim Special Edition: Creation Kit
The Creation Kit is the official Bethesda tool for creating and editing mods. It has been available in one form or another through the release of the last several Fallout and Elder Scrolls games. It is invaluable if you are interested in working with mods for modern Bethesda games.
Beyond allowing users to build their own original mods, the Creation Kit (or CK) can tweak and change things throughout mods and official content in ways not possible through other tools.
Like with Skyrim, the Creation Kit doesn’t ship with a pre-configured .ini, and the “default” configuration generates when the tool runs for the first time.
While you won’t be building new mods in this guide, you will be importing mods originally designed for Skyrim LE, and the Creation Kit will allow you to re-save (and thus, update) them to work with Skyrim SE.
- Download and install the Special Edition: Creation Kit.
- Start the Creation Kit Via Steam.
- Extract the Scripts folder.
- Once the Creation Kit is loaded, exit the program.
A few edits need to be made before you can use the CK to port mods.
- Download the premade CreationKitCustom.ini here
- Extract it to Steam\steamapps\common\Skyrim Special Edition.
The custom ini file sets up the CK to allow multiple masters and properly load DLC content.
Creation Kit Platform Extended for Skyrim
Various patches and bug fixes for the Creation Kit SE to make life easier.
A collection of modifications, enhancements, and reverse engineered resources for SSE CK version 1.5 and 1.6.
Modding Tools
Making Skyrim Great One Alteration At A Time
It's highly recommended to create a folder for all your modding tools, ideally at the root of a drive, e.g. C:\Modding Tools, or your MO2 folder e.g. MO2\Tools.
Tools must be extracted from their archives (can't remain in their .7z file for example), and should have their own individual folders. Tools should be kept out of the Steam folder and its subfolders, and they MUST NOT be installed in a UAC-protected area e.g. Desktop, Program Files.
LOOT
LOOT is a utility for load order optimization and is critical for any modded Skyrim run, especially with a list as long as ours.
FOMOD Instructions - Loot Groups Configuration
- First time loading, LOOT will have no Masterlist data or default mod groups. (Colored Text indicates the colour of the node (default).
- Shut down Mod Organizer 2, if open. (If following the guide for the first time, MO2 hasn't even been installed yet.)
- Run LOOT from its installed location.
- Once LOOT has loaded, sort the load order by pressing the icon that says "Sort Plugins (it has three lines over each other.) This is in the top left corner
- If you have previously installed LOOT, you need to clear any old Custom Rules you may have added:
- Locate and click Game on the top menu, then select Clear All User Metadata…, then press Yes. This will ensure you have a clean set of rules.
- The guide requires the addition of new LOOT Mod Groups to sort the load order properly:
- Run LOOT (if it's not still loaded from the last step. If you closed it, you can load it through MO2 at this point if desired.)
- For the top menu, locate and click on Game.
- Click Edit Groups.
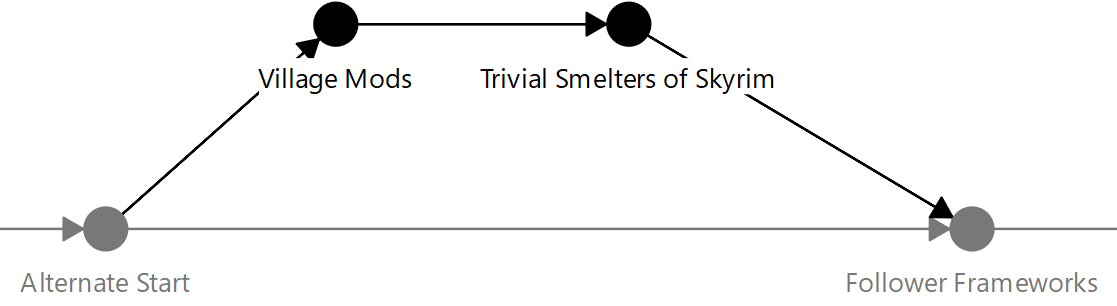
- In the Group Name box, type Village Mods, then press the Add a new Group button.
- Left-click the Alternate Start node to select it.
- Double-click and hold while dragging a line from the Alternate Start to the Village Mods node that you created. Village Mods should turn green.
- Create a new group called Trivial Smelters of Skyrim,
- Connect the Village Mods to the Trivial Smelters of Skyrim node that you created. Trivial Smelters of Skyrim should turn Green.
- Connect Trivial Smelters of Skyrim to Follower Frameworks, Trivial Smelters of Skyrim should turn black.
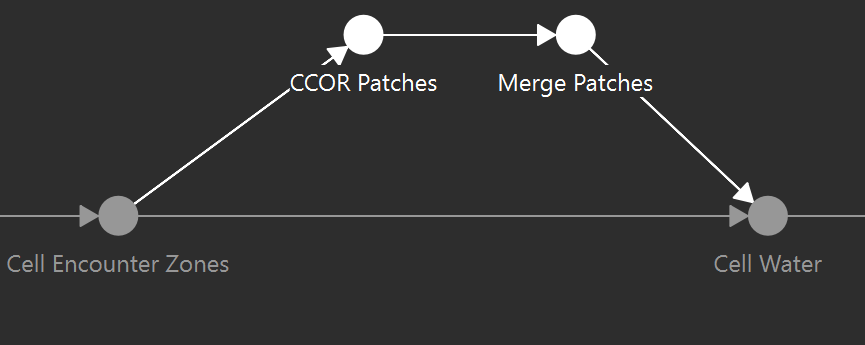
- Create a new group called CCOR Patches
- Left-click and drag a line from Cell Encounter Zones to CCOR Patches node that you created. CCOR Patches should turn green.
- Create a new group called Merge Patches
- Connect CCOR Patches to the Merge Patches node that you created. Merge Patches should turn green.
- Connect Merge Patches to Cell Water. Merge Patches should turn black.
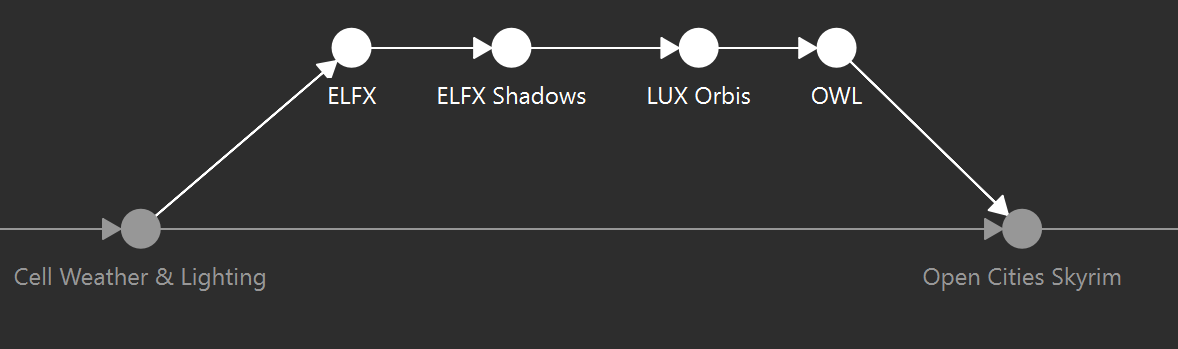
- Create a new group called ELFX
- Left-click and drag a line from Cell Weathers & Lighting to ELFX node that you created ELFX should turn green.
- Create a new group called ELFX Shadows
- Connect ELFX to ELFX Shadows the ELFX Shadows node that you created. ELFX Shadows should turn green.
- Create a new group called LUX Orbis
- Connect ELFX Shadows to LUX Orbis node that you created LUX Orbis should turn green.
- Create a new group called OWL
- Connect LUX Orbis to Owl node that you created. OWL should turn green.
- Connect OWL to Open Cities Skyrim, OWL should turn black.
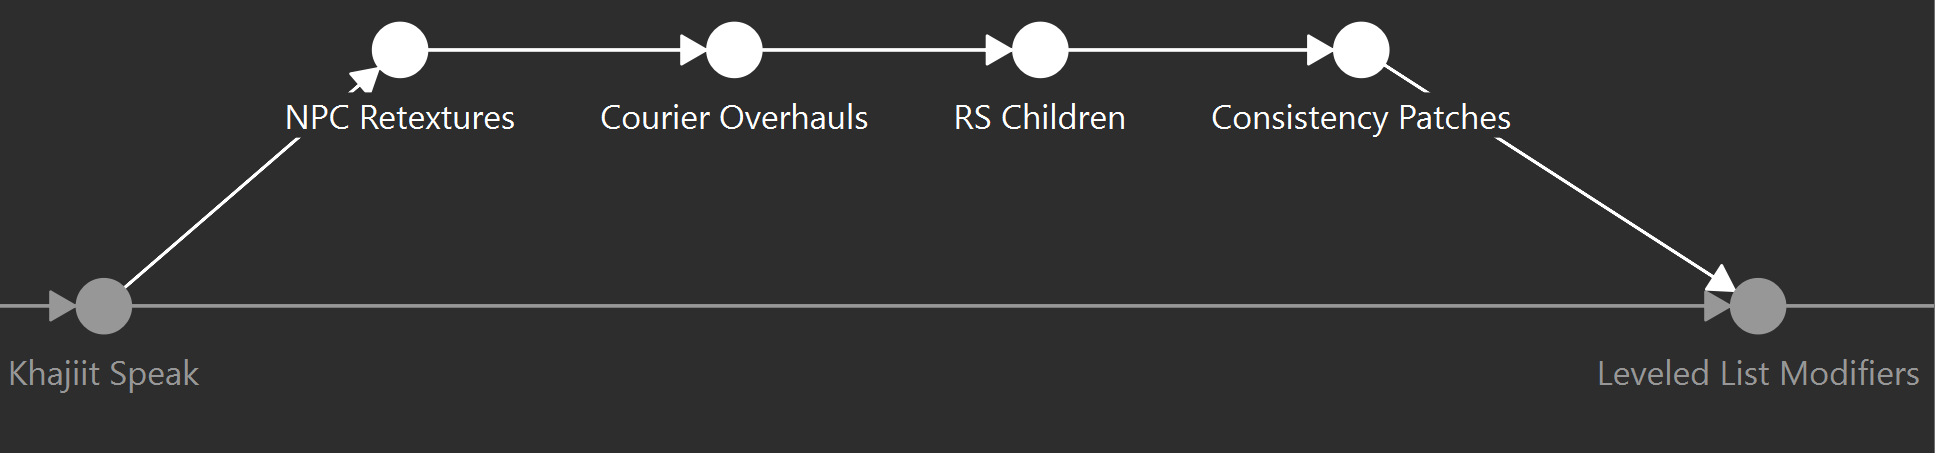
- Create a new group called NPC Retextures
- Left-click and drag a line from Khajiit Speak to the NPC Retextures node that you created NPC Retextures should turn green.
- Create a new group called Courier Overhauls
- Connect NPC Retextures to the Courier Overhauls node that you created Courier Overhauls should turn green.
- Create a new group called RS Children
- Connect Courier Overhauls to RS Children; RS Children node that you created should turn green.
- Create a new group called Consistency Patches
- Connect RS Children to Consistency Patches; Consistency Patches node that you created should turn green.
- Connect Consistency Patches to Leveled List Modifiers; Consistency Patches should turn black.
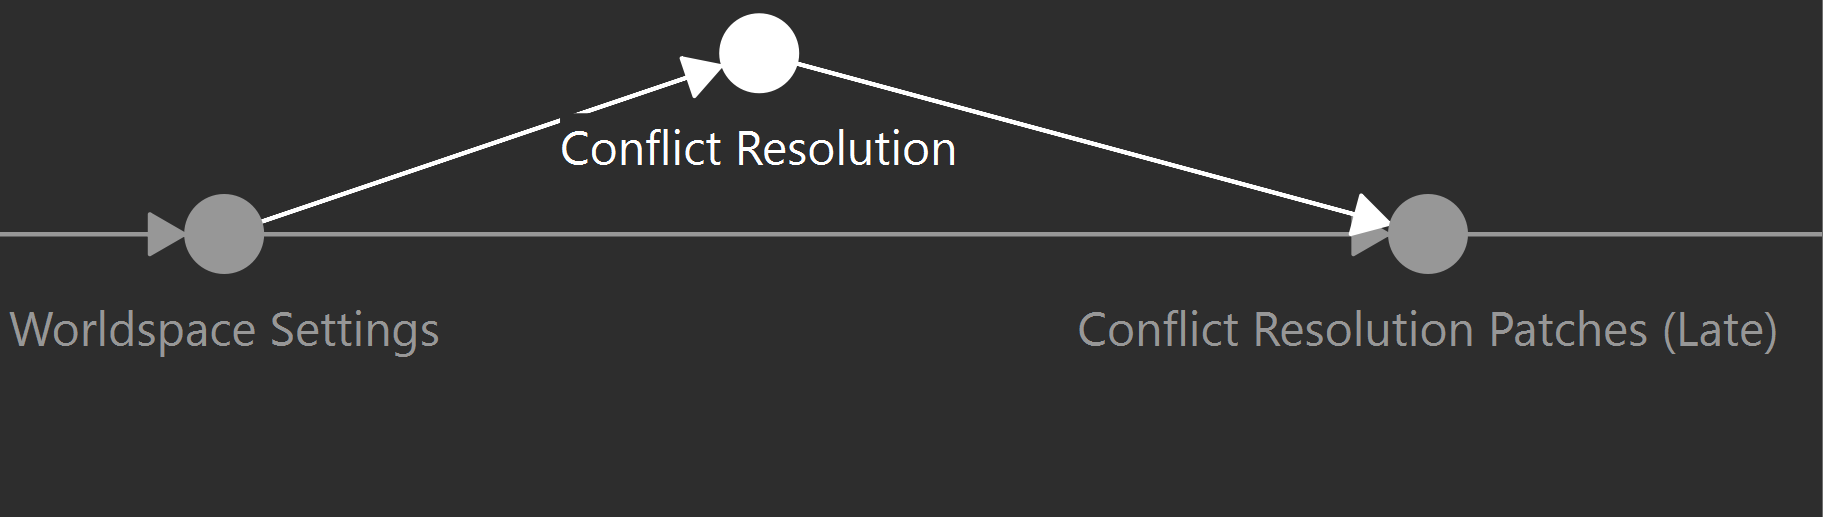
- Create a new group called Conflict Resolution
- Connect Woldspacesettings to Conflict Resolution; Conflict Resolution node that you created should turn green.
- Connect Conflict Resolution to Conflict Resolution Patches (late); Conflict Resolution should turn black.
- Verify that all of the newly added groups are showing as black. Press Auto-arrange groups to clean up the group connections. Press Save to exit this interface.
- You can now close LOOT.
xEdit
This program is an essential tool that will help with cleaning mods of dirty edits and enable the creation of patches required by this guide.
- xDump.exe to SSEDump.exe
- xDump64.exe to SSEDump64.exe
- xTESEdit.exe to SSEEdit.exe
- xTESEdit64.exe to SSEEdit64.exe
- Native 4K Monitors
- Right-click on SSEEdit64.EXE.
- Select “Properties”.
- Select the Compatibility Tab.
- Click on “Change High DPI Settings”
- Ensure “Override High DPI Scaling Behavior” is checked.
- Scaling should be performed by the “SYSTEM”.
Mators xEdit Patching Framework
MXPF is an xEdit scripting library that provides a variety of functions for the generation of patches.
- Click on Code then click on Download zip.
- Once downloaded extract the contents of the Edit Scripts folder in the archive to the Edit Scripts folder found in the SSEEdit main installation folder.
Persistentify Those Plugins
Inspired by ESMIfyer, this xEdit script targets all relevant reference types that may need to be updated (currently ACHR/REFR/PHZD), but also uses a number of filters to cut out every false positive it can conceivably target without live human intervention.
- Extract the contents of the archive to the Edit Scripts folder found in the SSEEdit main installation folder.
TES5EditScripts
Bunch of useful xEdit Scripts.
- Click on Code then click on Download zip.
- Once downloaded extract the contents of the Edit Scripts folder in the archive to the Edit Scripts folder found in the SSEEdit main installation folder.
WICO cleanup script
This is a script that will help clean up Windsongs Immersive Character Overhaul.
- Once downloaded extract the contents of the Hishy_NPC_RecordForwarding.pas-5049-2-5b archive to the Edit Scripts folder found in the SSEEdit main installation folder.
Dark Face Issue Reporter
This is an xEdit script to find "Dark Face Issues" and address them, then create console command batch files for checking in game.
- Once downloaded, extract the contents of the DarkFaceIssueReporter archive to the Edit Scripts folder found in the SSEEdit main installation folder.
- Once installed, Edit darkfaceissuereporter.ini as follows:
-
- CreateDebugLogFile=True
- CreateConsoleCommandBatchFile=True
- CreateDarkFaceCollector=True
- DarkFaceCollectorFilename=darkfacecollector.esp
Dark Face Issue Reporter Ignore
This is an INI file that will tell the Dark Face Issue Report Script to ignore certain NPCs that give false positives when the script is run.
- Once downloaded Extract the content of the archive and place the INI file into the SSEEdit/Edit Scripts folder.
Synthesis
A framework and GUI to construct a single Bethesda game patch from many patcher sources. Designed to allow any program to work as a patcher as long as it conforms to the CLI API.
Lexy's LOTD Synthesis Profile
This mod is a premade profile to use with Synthesis v0.36.5
- Extract the contents of the archive to where you installed Synthesis.
- Launch Synthesis and allow the Patchers to compile.
- Once the patchers have finished compiling, exit Synthesis.
Cathedral Assets Optimizer
Cathedral Assets Optimizer is a tool aiming to automate asset conversion and optimization for Skyrim Special Edition.
Lexy's LOTD CAO Profiles
Cathedral Assets Optimizer profiles for Lexy's LOTD Skyrim Special Edition.
- Once downloaded, extract the contents of Lexy's LOTD CAO Profiles to the Cathedral Assets Optimizer\profiles folder.
Wrye Bash
The function of this tool is to manage mods and create Bashed Patches. Bashed Patches merge the leveled lists from the installed mods and has some limited functionality to merge mods and tweak game values. For this guide, you will only use the Bashed Patch functionality.
- Download the file manually.
- Extract the contents of the file to a location of your choice. It is advised not to install it in any UAC-controlled locations. It CAN be installed into the Skyrim main directory, if you so choose, with no detrimental effects.
zEdit
This tool is similar to SSEEdit. It includes zMerge, which is used for merging plugins.
Script Extenders
Where the Real Magic Happens
Skyrim Script Extender - Special Edition
SKSE is absolutely essential. It extends the scripting capacity of the game to allow mods to do things that would not normally be possible in the base Skyrim engine. Many mods depend upon it.
- Install ONLY the following files into the main Skyrim Special Edition directory:
skse64_1_6_1170.dll
skse64_loader.exe
BethINI
Skyrim INI Files Made Easy
Bethini Pie (Performance INI Editor)
Bethini Pie (Performance INI Editor) is a universal tool to simplify editing INI configuration files via a graphical user interface.
Mod Manager
Accept No Substitutes
Mod Organizer 2
This is the tool we'll actually be using to download, install and manage the mods. Don't worry if it looks daunting, we'll set you right shortly.
Installing Mod Organizer 2
Let the fun Begin
Installing Mod Organizer 2:
- Run the Mod Organizer 2 installation file.
- If this is your first time running MO2, Windows Defender may provide a warning that it does not recognize the application and has prevented it from running. If this occurs, click MORE INFO, and then click RUN ANYWAY.
- Depending on your system settings and setup, it is also possible that you will be presented with a User Account Control warning. Should this appear, click Yes.
- Select an installation location, keeping in mind the above Warning.
- After the installation is complete, run MO2 from the installed file location.
- At the "Create New Instance" prompt that appears, select "Create a Portable Instance".
- In the following prompt, select Skyrim: Special Edition.
- In the following prompt, select Steam.
- In the following prompt, check "Use profile-specific game INI files", and "Use profile-specific save games".
- In the following prompt, make sure the Location field matches the location where MO2 was installed.
- In the following prompt, click Finish.
- In the following prompt, select Do Nothing.
Configuring Mod Organizer 2
Mod Organizer 2 is now fully installed. There is some additional configuration settings that will ensure full integration with the Nexus and to provide additional levels of user comfort while installing the guide.
1. Mod Organizer 2 Needs to be Connected to the NEXUS
To streamline and integrate MO2 fully with the Nexus (where the vast majority of mods you will be downloading come from), you will require a Nexus Account. If you do not have one, you can create one here. This account has no fees (though a free account will also be very limited in bandwidth). A Premium subscription with no bandwidth cap is available on a monthly basis. Specifics for these Premium subscriptions can be found on the NEXUS website.
- In the toolbar of Mod Organizer 2, locate the 'Settings' button (a spanner and screwdriver icon... wrench and screwdriver for you Americans).
- At the top of the window that appears, press on the Nexus tab.
- Click on the Connect to Nexus button.
- A new window will open in your browser. The Nexus will request permission to link Mod Organizer 2 with your Nexus Account. After allowing this, you can close the browser window.
- In the Mod Organizer 2 settings menu, press OK to close the window.
2. Mod Organizer 2 Themes
Some users may find the default Theme of Mod Organizer 2 overly bright, harsh, or in some other way displeasing. This can be changed by:
- In the toolbar of Mod Organizer 2, locate the 'Settings' button (a spanner and screwdriver icon... wrench and screwdriver for you Americans).
- At the top of the window that appears, press on the Theme tab.
- Locate the Style drop-down (possibly with the word "None" in it currently). Any theme may be selected, based on user preference.
- Most users report the most comfort with the 'dark', 'Paper Dark', or 'vs15 Dark' themes.
- After selecting a theme, press OK to close the window.
3. Information Displays
The left and right panes of Mod Organizer 2 can be configured to display only fields that you want, need, or use. This can be done by:
- In the left pane of Mod Organizer 2, right-click any of the column headers (for example 'Mod Name', 'Conflicts', 'Flags', etc.)
- Check 'Content'. This will show graphical representations of certain file types included in a mod. You can mouse over the graphics for an expanded view with a legend.
The left pane will also show file conflicts (which can be useful for a number of applications). By default, however, it does not compare Loose Files to those located in a BSA. Though it is not perfectly accurate yet, there is a setting that will allow this comparison. It can be enabled by:
- In the toolbar of Mod Organizer 2, locate the 'Settings' button (a spanner and screwdriver icon... wrench and screwdriver for you Americans).
- At the top of the window that appears, press on the Workarounds tab.
- Under the Options category, check 'Enable archives parsing (experimental)'. While not perfectly accurate yet, this will show conflicts with BSA archives in the Conflicts column of the left pane.
Finally, the ability to see Meta Information - human readable file names and versions of downloaded files - can be invaluable in troubleshooting efforts. Additionally, by default, the download list has a LOT of wasted space that can be compacted. These two items can be enabled by:
- In the toolbar of Mod Organizer 2, locate the 'Settings' button (a spanner and screwdriver icon... wrench and screwdriver for you Americans).
- At the top of the window, press on the General tab.
- Under the Download List category, check 'Show meta information' and 'Compact list'. Showing meta information will show human readable names of files as well as the file version in the Downloads tab of the right pane. Compact list will get rid of the unnecessary whitespace in the Downloads tab and will fit more files on the screen at once.
- Press OK to close the window.
BSA Extractor Plugin Setup
The plugin is enabled by default, but we do want to change one of the plugin settings by doing the following:
- Click the "spanner and screwdriver" icon in the top left corner of MO2.
- Click the Plugins tab.
- Find and select the BSA Extractor plugin.
- On the right side, make sure the only_alternate_source option is set to false.
Anytime a Mod is installed that contains a BSA file, a prompt will appear asking if you wish to extract the BSA file. There are three options - be careful which button you press.
If the mod is marked with the ![]() EXTRACT THE BSA Tag:
EXTRACT THE BSA Tag:
- SELECT YES.
- The prompt will then ask if you wish to delete the BSA after extraction. Select YES for this as well.
For all other mods, SELECT NO.
NOTE: Be careful not to turn off the prompt! If you do this, you can re-enable them in the general tab of Settings, by pressing Reset Dialog Choices.
This dialog box will appear in the future for any mod that contains a BSA file. ENSURE YOU ARE CHOOSING THE CORRECT OPTIONS when this dialog appears in the future - not every mod with a BSA needs extraction, so be sure you are checking the requirements BEFORE you make a selection.
Mod Organizer 2 Profile Creation
"Profiles" is a function of Mod Organizer 2 that allows multiple "versions" of a modded installation of Skyrim, within some limits. We will be using it primarily to assist in the creation of Merged Plugins late in the Guide installation. The process of creating a new profile will be needed at that point, but we will create a base profile now to familiarize you with the required steps.
By default, MO2 will be using a "Default" profile. We will be creating a "Vanilla" profile, which will be used to establish a working baseline and for troubleshooting purposes.
1. Create the "Vanilla" Profile
- Locate and press the Configure Profiles button (most MO2 themes show this as an icon that looks like an ID card, but it can vary).
- In the Profiles Window, select Create.
- In the pop-up, type Vanilla Skyrim SE.
- Ensure that the Default Game INI Settings checkbox is unchecked.
- Select OK.
- Verify that Vanilla Skyrim SE appears in the list on the left.
- Verify that the Use profile-specific Save Games is checked.
- Verify that the Use profile-specific Game INI Files is checked.
- Exit the Profiles Window by pressing Close.
- In the Profile drop-down above the mod list (aka "the left pane") select Vanilla Skyrim SE.
- Locate and press the Configure Profiles button (most MO2 themes show this as an icon that looks like an ID card, but it can vary).
- Click on and highlight the Default profile.
- Click on Remove.
- In the pop-up that appears, select Yes.
- Exit the Profiles Window by pressing Close.
- Verify that Vanilla Skyrim SE appears as the selected profile (shown above the the left pane).
Integrating Tools into Mod Organizer 2
The final major step is to set up many of the previously installed tools to work from within Mod Organizer. Running these tools via Mod Organizer 2's launcher will allow the other tools to make use of the Virtual File System (VFS) and see the files from the installed mods the same way as the game will when it is run and loaded.
- Locate and press the Executables button (most MO2 themes show this as an icon that looks like a gear but can vary).
- A pop-up box will appear. Locate and press the "+ (Add an executable)" button.
- In the pop-up box, select "Add from file..."
- In the Windows folder that opens, navigate to and double-click on SSEEdit64.exe in its installed location.
- Ensure no optional checkboxes are checked.
- Select "Apply" at the bottom right of the pop-up.
- Repeat steps 2 through 6, selecting "SSEEditQuickAutoClean.exe" in step 4. This second instance will be used only for cleaning the plugin files and will be explained further later in the guide.
- Repeat steps 1 through 6 for Bethini, Wrye Bash, Synthesis, zEdit, and LOOT, selecting the appropriate executable file in each case.
- No arguments are needed for Wrye Bash, Synthesis, or LOOT.
- In the argument field of "zEdit" add -appMode="merge"
- After all the programs have been added, click on the "OK" button on the bottom right of the Modify Executable window.
Running BethINI
Run, BethINI, Run
- Run BethINI Pie.
- If you are running BethINI Pie for the first time, a popup window asking you to select your game will appear. Select Skyrim Special Edition from the dropdown menu.
- If you are running BethINI Pie for the first time, another popup window should be asking you to setup:
- Game Path: Make sure this points to Steam\steamapps\common\Skyrim Special Edition
- INI Path: Make sure this points to Mod Organizer 2\profiles\Vanilla Profile
- Once that is done, click OK.
Basic Tab
- Press the [Reset to Default] button and wait until the "Preset Default Applied" message is displayed.
- Click the [High] preset and wait until the "Preset Bethini High Applied" message is displayed.
- Please avoid the temptation to click 'Ultra', even if the PC is high-end.
- Click the Apply Recommended Tweaks Button and wait until the "Preset recommended applied." message is displayed.
- Display:
- Resolution: This should be your system's native resolution.
- Display Mode: Borderless Windowed
- Default World FOV: 85
- Default FOV: 85
- Default 1st Person FOV: 85
- 64 Bit render Targets: Ticked
- Vsync: Unticked
- Lock Framerate: Unticked
- Adjustments:
- Bloom Boost: 5.0
- Freebies Seen: ticked
General Tab
- Saved Games:
- Autosaves: Unticked
- Save on Pause: Unticked
- Save on Travel: Unticked
- Save on wait: Unticked
- Save on rest: Unticked
- Papyrus:
- Post-Load Update Time: 2000
- Max Allocated Memory: 500000
Gameplay Tab
- NPC Use Ammo: Ticked
- Over Encumbered Reminder: 300
- Tutorials: Unticked
Interface Tab
- Bethesda Modding Platform: Unticked
- Mod Manager Menu: Unticked
Environment Tab
- Grass:
- Density: 60
- Diversity: 15
- Water
- Reflect Sky: Unticked
Shadows Tab
- Ambient Occlusion:
- Ambient Occlusion: Unticked
- SAO Bias: 0.5
- SAO Exp Factor: 0.22
- SAO Intensity: 12.0
- SAO Radius: 850
- Ambient Occlusion: Unticked
Visuals Tab
- Sun:
- Sun Base Size: 200
- Sun Glare Size: 282
- Effects:
- Particles: 7500
- Lens Flare: Unticked
View Distance Tab
- Distant Details:
- Tree LOD Distance: 0 (If you are NOT going to run DynDOLOD Ultra Trees leave this at the default)
- Once all that is done, Click File from the menu, then "Save" and confirm the changes.
- Now, you can exit and close BethINI Pie.
Post BethINI Configuration Changes
Tweaking BethINI
Skyrim.ini
Add The following to Skyirm.ini:
[General]
- sLanguage=English (Only non-english users need to add this.)
Setting up Mod Organizer 2 Initial Load Order
Sorting the messy Load Order
Skyrim: SE will have automatically downloaded and installed the base game and the eight official DLC files for Skyrim. MO2 will have detected these files but will have them ordered alphabetically, which is not the desired load order. You will also note that under the "category" heading, they will all be listed as "Non-MO", - indicating that these files are located in the Skyrim base directory, NOT MO2's mod system. These are the ONLY FILES that should ever show this designation while installing the guide. If you see this anywhere else, you have incorrectly installed a modification.
1. Initial detection of the Skyrim DLC will place the assets in an incorrect order. They should be sorted in order of release.
- In the left pane, drag and drop the eight DLC files into the following order (top-to-bottom):
- DLC: Dawnguard
- DLC: HearthFires
- DLC: Dragonborn
- Creation Club: ccBGSSSE001-Fish
- Creation Club: ccQDRSSE001-SurvivalMode
- Creation Club: ccBGSSSE037-Curios
- Creation club: ccBGSSSE025-AdvDSGS
- Creation club: _ResourcePack
2. The Paid For Creation Club Content
If you have more DLC files than the eight mentioned above, you have installed the Paid Creation Club Content. The guide does not include or support those.
To remedy this, you have 2 options:
- Delete all additional .esm's, .esl's and .bsa's that are for the Paid Creation Club Content
- or Use Kezyma's Curation Club for Mod Organizer to move the Creation Club Content into separate mods in MO2, only enabling the ones mentioned above.
There is an add-on guide for Paid Creation Club Content (and much more) on our Discord. If you plan to follow along the add-on guide later, keep the Paid Creation Club files installed. Otherwise feel free to delete them.
3. The load order of the Skyrim DLC plugins can be confirmed by LOOT.
- From the drop-down Executable list (right-side, above the plugins list), select LOOT.
- Press the Run button.
- Once LOOT has finished loading, locate the "Sort Plugins" button in the top left corner and click on it.
- Its icon is three horizontal lines above each other.
- LOOT will sort your current Load Order.
- LOOT will automatically download any updates to its masterlist.
- It will then compare the files it sees (which is only the DLC at this point) to this masterlist file and sort them into a proper order.
- Additional messages will be displayed after sorting that indicate that there are ITMs and Deleted References in these files. An explanation of those terms will be given later on in the guide.
- Click Apply Sorted Load Order to accept LOOT's generated load order (if LOOT made any changes).
- If no changes were made (which happens on occasion), the Apply button may not appear. This is normal and of no concern.
- Close LOOT by using the X button in the top right corner of the LOOT window.
This process has taught you three processes:
- How to manually move elements of your Load Order around. Though not done frequently, it may be needed on occasion.
- What to do about The Paid Creation Club Content.
- Loading of LOOT via Mod Organizer. This same process applies to all programs loaded via MO2, and will not be repeated in other steps during the modding installation process. If a tool needs to be loaded in any other fashion, those instructions will be noted when needed.
- Sorting of a load order using LOOT. This will only be done once more in the guide, near the end of the process. However, this process is universal to ANY mod list and can be applied in many other circumstances.
Creating Legacy Of The Dragonborn: Special Edition Profile
We like Profiles
So far, we have installed and setup Mod Organizer 2 to work with all of the required tools and to load with a Vanilla profile. You also have the ability to load Skyrim SE with a single click, which can be useful for troubleshooting, but isn't much good for playing a modded game. The next thing to do is create a new profile where we will install all of the mods.
Create the Modded Skyrim Profile
- Go to Profile Settings, click on the Vanilla Profile and select "Copy". In the Name-Box type "Legacy of the Dragonborn - Special Edition" (or another name of your choosing)
- Verify Use profile-specific Game INI Files is checked.
- When you create a new profile, Mod Organizer creates new copies of the Skyrim.ini and SkyrimPrefs.ini for use by that profile and that profile only. If and when you make changes to these files through MO2, you will be making changes to the profile-specific versions of these files, not the ones that are in your Documents directory.
- Also, verify that Use profile-specific Save Games is checked on each new profile.
- Verify Use profile-specific Game INI Files is checked.
xEdit Configuration
From MO2, run SSEEdit and perform the following:
- At the popup window, click OK to load the selected plugins.
- Wait for the plugins to load. You will see the message "Background Loader: finished" when the program is done loading.
- Right-click on any plugin in the list on the left side of the screen.
- From the popup menu navigate to Other→Options; a new popup box should appear.
- Uncheck Simple Records LAND, NAVI, NAVM, CELL, WRLD (requires restart).
- Click OK.
- Exit SSEEdit.
Complete SKSE Installation
You may recall that in the SKSE installation earlier, we only installed two files directly to the Skyrim main directory. We did not install all of the scripting files. We will be using this now to show how to install a mod from an archive, which will be a needed skill for a small number of mods we will be installing later.
- Ensure that the newly created "Legacy" profile is selected at the top of the left pane in Mod Organizer 2.
- In the MO2 toolbar, locate and click on the "Install Mod" button (it will look like a file folder in most themes).
- In the window that opens, navigate to the location of the SKSE file downloaded earlier. Click on it to highlight it.
- Click on Open.
- In the next window that appears, if this is the first time you've seen this window (and we assume it is), MO2 will give you a quick tutorial on how to use this tool. Read it to help with understanding the following instructions. Click on the flashing tutorial to continue.
- Replace the text (if any appears - sometimes there isn't any) with SKSE Scripts. This is the name that will appear in the left pane of Mod Organizer 2 after installation.
- The SKSE archive is not properly set up for an automatic installation; in the file tree, navigate to and highlight the Data folder inside the archive.
- Right-click on Data.
- In the right-click menu, select Set Data Directory. The display should change to show only a Scripts folder, which should be checked. A green "The content of looks valid." will appear at the bottom of the window if you have done this correctly.
- Select OK.
A new entry should appear in the left pane with the name given it above and an empty checkbox next to it. This indicates that it has been installed but not activated. ACTIVATE the mod by clicking on the empty checkbox. This should be done for ALL MODS as you install them. Also, note that MO2 does not have a version number or category set for this mod because it doesn't have any Nexus metadata. We will manually input this information in a later step.
SKSE Configuration
With the script files now installed, we are going to create and configure SKSE for the install. 1. Setup SKSE for 4K Monitors
- Navigate to steamapps\common\Skyrim Special Edition
- Right-click on skse64_loader.exe
- Select Properties.
- Select The Compatibility Tab.
- Press Change high DPI settings.
- Check override high DPI Scaling Behaviour. Scaling performed by:
- From the drop-down menu, select Application.
- Click OK.
- Press Apply.
2. Create the SKSE.INI file
- Right-click SKSE Scripts in the Mod Organizer mod list.
- Select Open In Explorer.
- Create a new file folder called "SKSE".
- Double-click on the new folder.
- Create and open a text file named SKSE.ini.
- This should give you a folder structure of ...\mods\SKSE Scripts\SKSE\SKSE.ini
3. Edit the SKSE.INI Paste the following into the SKSE.ini file. You can do with your text editor of choice, but it might be easiest with Notepad or Notepad++:
[General]
ClearInvalidRegistrations=1
[Display]
iTintTextureResolution=2048
Save and close SKSE.ini, then exit explorer.
Install Verification
We just did a LOT of background work, so it's time to do a test run. This will verify that SKSE is installed and working correctly.
-
- Run Skyrim: SE by using the SKSE Executable in MO2.
- After the game has loaded into the main menu (listen for the Skyrim Theme to play), open the console with the ~ key (by default).
- This is the key directly above the TAB key on most keyboards.
- In the console that opens, type getskseversion and press enter.
- Verify that a new line appears in the console, indicating the version of SKSE you have installed.
- If there is no output or a version other than the one you installed appears, reinstall SKSE with the correct files or verify the correct installation against the instructions provided above.
- Exit Skyrim.
Mod Organizer 2 Plugins
Plugins... for the future...
Autoscroller Plugin Mo2(For Skyrim)
This plugin for Mod Organizer 2 make it if you select a plugin in the right pane (Plugins List), the plugin will automatically scroll the left pane (Mod List) to its parent module. Conversely, when a mod is highlighted in the left pane (Mod List), the Plugins List will scroll to the corresponding plugin.
- Extract the contents of the archive to your
Mod Organizer 2\pluginsdirectory.
Filter Fix for Mod Organizer
Are you probably fed up with the fact that the quick filter in MO2 does not expand the separators when searching for mods and does not allow you to go to the mod by clicking on it when it is found? - I have solved this problem.
- Extract the contents of the archive to your Mod Organizer 2\plugins directory.
Merge Plugins Hide
This is a plugin for Mod Organizer 2 that allows you to hide merged plugins easily.
- Navigate to Mod Organizer 2\Plugins
- Extract the contents of the archive to the MO2 plugins folder.
- Load Mod Organizer 2 and press the screwdriver and spanner icon.
- Navigate to the Plugins tab.
- Scroll down until you find Tools >> Merge Plugins Hide.
- In the right-hand box, change "hide-type" from "mohidden" to "optional", (must be all lowercase)
- Click OK.
Mod Organizer 2 Removal Tool
This tool for Mod Organizer 2 simplifies removing files from mods. It supports relative paths with wildcards (*). See usage examples below.
- Press Code
- From the drop-down menu, find Download Source code and select Zip.
- Extract the mo2-removal-tool.py found in the mo2-delete-main folder in the archive to MO2\plugins
- Load Mod Organizer 2 and press the screwdriver and spanner icon.
- Navigate to the Plugins tab.
- Scroll down until you find mo2-removal-tool.
- In the right-hand box, change plugin-optional to true
- In the right-hand box, change removal-type to mohidden
- Click OK.
Prepare Merge - Mod Organizer 2 Plugin
This plugin for Mod Organizer 2 finds and enables the mods containing a selected list of plugins and their required masters. Then it places the selected plugins at the end of the load order. Useful for preparing a merge of plugins with e.g. zMerge.
- Extract the contents of the archive to your
Mod Organizer 2\pluginsdirectory.
FOMOD Plus - A Mod Installation Overhaul for Mod Organizer 2
A total rewrite and overhaul of the FOMOD experience. Show and install previous choices, filter your modlist by FOMOD-installed mods, scan to pre-populate FOMOD content detection, non-blocking, smart-resizing installer window, and more!
- Extract the contents of the archive to your Mod Organizer 2 directory.
- Load Mod Organizer 2 and press the screwdriver and spanner icon.
- Navigate to the Plugins tab.
- Scroll down to the Installer section and find FOMOD Plus.
- In the right-hand box, change show_fomod_filter to false.
- Click OK.
Set CPU Affinity for Mod Organizer
This plugin for Mod Organizer 2 automatically calculates and sets the CPU affinity for Skyrim Priority SE AE - skse plugin by Boring3.
- Extract the contents of the archive to your
Mod Organizer 2\pluginsdirectory.
Bethesda ESM File Maintenance
Debugging the debugged bugs
Before we start downloading new modification files, we have a few bits of modding to do to the base ESM plugin files. Bethesda's system of plugin creation can be, at time, finicky. It should be no surprise that even they - like a number of mod authors - have had some accidental and unintended duplication of records in the DLC plugin files.
These unintended duplicates are referred to as IDENTICAL TO MASTER records, or ITMs. In most cases, these duplications are not game-breaking, but they can have unintended effects in a highly modified game. Usually, they can be ignored for this reason. In a heavily modified game, however... like the one you are about to start creating... they can have very undesirable effects.
Another common and unwanted issue are DELETED RECORDS. You would think that, when you delete something in the Creation Kit, it would remove any reference to that item in the plugin file. It does not - it puts a flag on the record instead. This is what is called a UDR, and this kind of error should always be repaired, as these can cause CTD Errors... and nobody wants that. The proper fix for this is to undelete the record and flag them as disabled.
Both ITMs and UDRs exist in the Bethesda DLC plugins and need to be cleaned. Fortunately, we have a tool to do this work for us.
Note that the process described below is universal to ALL MODS that need cleaning. If a mod you download later on has special instructions that mention cleaning, this is the process you will need to follow. It will not be repeated for any other mods later on.
CLEANING INSTRUCTIONS
- Create a backup of the original files.
- Navigate to ...\Skyrim Special Edition\Data.
- Copy-Paste the following files to your desktop or other readily available location:
- Update.esm
- Dawnguard.esm
- HearthFires.esm
- Dragonborn.esm
- ccBGSSSE001-Fish.esm
- ccQDRSSE001-SurvivalMode.esl
- ccBGSSSE037-Curios.esl
- ccBGSSSE025-AdvDSGS.esm
- _ResourcePack.esl
- Clean the original files.
- Start Mod Organizer 2, if not already running.
- From the drop-down executables menu, select SSEEdit - Quick Auto Clean.
- Ensure this is the xEdit version with Quick Auto Clean, as this is the one that will handle the removal of ITMs and UDRs.
- Press Run.
- In the file selection menu that appears, check the box next to Update.esm and no other files.
- If any additional files need loading, xEdit will automatically load them.
- Click OK.
- xEdit will now run the cleaning process automatically.
- Wait for the process to complete, indicated by the appearance of the message Quick Clean Mode finished.
- When the message has appeared, close xEdit by clicking on the X in the title bar of the application ("X-ing out").
- Repeat steps 2 through 8 for Dawnguard.esm, HearthFires.esm, Dragonborn.esm, ccBGSSSE001-Fish.esm, ccQDRSSE001-SurvivalMode.esl, ccBGSSSE037-Curios.esl, ccBGSSSE025-AdvDSGS.esm, _ResourcePack.esl
Manual xEdit Cleaning
Dawnguard.ESM has to be treated slightly differently from the other ESM files, as it has a small number of manual edits that must also be done. Follow the below instructions carefully. You don't want to accidentally delete something you should not... which is one reason you have those backups.
- From the drop-down executables menu, select SSEEdit.
- Ensure this is the xEdit version without Quick Auto Clean.
- Press Run.
- In the plugin selection window, RIGHT-CLICK. Select NONE.
- Place a check mark in the box next to Dawnguard.esm.
- Select OK.
- Dawnguard will now be loaded into xEdit, along with any other required files.
- After all plugins are fully loaded, in the left pane, click on the "+" next to Dawnguard.esm.
- Its file tree will expand.
- Locate and press the "+" next to Cell.
- Its sub-records will appear.
- Locate and press the "+" next to Block 5.
- Its sub-records will appear.
- Locate and press the "+" next to Sub-Block 3.
- Its sub-records will appear.
- Locate and click on 00016BCF.
- The right pane will now display all records associated with this cell record.
- In the right pane, scroll down and locate the XEZN sub-record that refers to RiftenRatwayZone [ECZN:0009FBB9.]
- Right-click on the above entry under "Dawnguard.esm" select Remove.
- A window may appear warning you that you are making a change to the file – when able, allow the change.
- YOU ONLY NEED TO REMOVE THE RiftenRatwayZone [ECZN:0009FBB9.] ENTRY, NOT THE ENTIRE RECORD.
- Follow the same process above for:
- Block 2 -> Sub-Block 1 -> 0001FA4C CWGuardTemplates
- Remove the entire record
- Block 8 -> Sub-Block 1
- (Remove the entire sub-block)
- Block 2 -> Sub-Block 1 -> 0001FA4C CWGuardTemplates
- Close xEdit and save by clicking the "X" in the program's title bar.
Create a New Mod in MO2
With all cleaning now completed, we will make these cleaned files into their own separate modification and restore the original files to the Skyrim directory. This will assist in 'future-proofing' your cleaned files for the inevitable Bethesda CC updates that would overwrite your cleaned files with the original versions.
- In your ...\Mod Organizer 2\mods folder, create a new folder called Cleaned Vanilla ESMs.
- In the Skyrim\Data folder, Cut and Paste the following files FROM the Skyrim\Data folder TO the Mod Organizer 2\mods\Cleaned Vanilla ESMs folder: Update.esm, Dawnguard.esm, Hearthfires.esm, Dragonborn.esm, ccBGSSSE001-Fish.esm, ccQDRSSE001-SurvivalMode.esl, ccBGSSSE037-Curios.esl, ccBGSSSE025-AdvDSGS.esm, _ResourcePack.esl.
- Cut and Paste the backup files you created earlier into the Skyrim\Data folder.
- Start Mod Organizer 2 (if not already active), or refresh it (press the Refresh button in MO2, or F5).
- A new mod should appear called "Cleaned Vanilla ESMs". If it does not appear, Right-Click -> All Mods -> Refresh.
- Activate the new mod.
With this process complete, we are now able to:
- Run Skyrim through Steam, resulting in a completely vanilla experience.
- Run Skyrim through MO2's "Vanilla Skyrim" profile using SKSE in the drop-down, resulting in a mostly vanilla experience.
- Run Skyrim through MO2's "Legacy of the Dragonborn - Special Edition" profile using SKSE in the drop-down, resulting in an SKSE-enabled Skyrim using cleaned vanilla assets.
From this point forward, unless otherwise noted, it will be assumed that you will always start Skyrim using the third option.
Level of Detail Generation
Even the stuff in the background is pretty...
xLODGEN
xLODGen
This is a utility used to generate LOD meshes and textures "exactly" like the CK.
- Download the main latest version of the xLODGen archive.
- Extract the contents to a new folder called xLODGEN but DO NOT PUT THE FOLDER INSIDE the main Skyrim Special Edition OR Mod Organizer 2 folder.
- Create a folder called SSELODGen_Output At the ROOT of a drive.
- Once the above is done, open Mod Organizer 2 and add xLODGenx64.exe as an executable.
- In the Arguments field enter -sse -o:"Drive Letter:\SSELODGen_Output"
ACMOS Road Generator
ACMOS Road Generator paints roads and/or paths on your xLODGen-generated terrain LOD, giving you a perfect world map with roads that matches your installed landscape mods. All major worldspace mods are supported.
- Once Downloaded, add ACMOS Road Generator.exe as an executable in MO2.
DynDOLOD
DynDOLOD 3 Alpha
This is a utility used to create a mod based on the load order, which adds custom, distant LOD for objects to Skyrim.
- Download the archive file.
- Extract the contents to a new folder called DynDOLOD Special Edition.
- Once the above is done, open Mod Organizer 2 and add TexGenx64 and DynDOLODx64 as executables.
- In the Arguments field, enter -sse for each executable.
- Navigate to
...\DynDOLOD Special Edition\Edit Scripts\DynDOLOD\and openDynDOLOD_SSE.iniin Notepad. - Using CTRL-F, search for "Expert". Set
Expert=1. - Using CTRL-F, seach for "Level32". Set
Level32=1. - Using CTRL-F, search for "DoubleSidedTextureMask". Remove the semi-colon ( ; ) in front of this line. This 'uncomments' the line so it can affect the LOD Generation. It should now read
DoubleSidedTextureMask=mountain,mtn. - Save and exit.
Plugin Merge Tools
Making Plugin Numbers a Little Less Scary
zMerge Setup
In this section you will set up zMerge so that you can create merged mods later on.
- Open zEdit and select zMerge from the drop-down menu.
- Press Start Session.
- Click on the cog in the upper-right corner.
- A new popup box should appear.
- Navigate to Integration Settings.
- Under Mod Manager, select Mod Organizer 2.
- Under MO2 Instance, select Portable.
- Under Mod manager path, fill in the file path to your main Mod Organizer 2 folder.
- Under Mod manager mods path, fill in the file path to your Mod Organizer 2 mods folder.
- Navigate to Merge Settings.
- Under Merge output path fill in the file path to where your Mod Organizer 2 mods folder is.
- Uncheck Disable plugins.
- Navigate to Archive Creation Settings.
- Under Advanced, change Minimum Files Per Archive to 999999.
- Under Advanced, ensure Create textures archive is unchecked.
- Click OK.
- Close zMerge.
Check these pictures on to see how to set up zMerge if you're having trouble.
ENB Post Processing
The Pretties Are Even Prettier
ENB Series
ENB Series Binaries
This is a graphics modification library designed to allow gamers to configure their games to their liking.
- At the bottom of the page, click the link for the latest version.
- At the bottom of the new page, click the first download link.
- Once the file has downloaded, open the Wrapper Version folder enclosed in the archive and extract ONLY the files d3d11.dll and d3dcompiler_46e.dll.
- Place the d3d11.dll and d3dcompiler_46e.dll into the main Skyrim Special Edition directory.
ENB Preset
Ljoss ReLUX for Cathedral Weather - Lexy's LOTD Official ENB Preset
A complete rewrite of my previous preset, code optimized to get the best possible quality without sacrificing performance. Supports Night and Predator vision and all vanilla effects. Include real-time snow cover effect.
- Extract the contents of the 2.1 folder in the archive to the Main Skyrim Directory.
From the ELE ELFX Combo Support Miscellaneous File:
- Extract the Weathers Folder to enbseries Folder (that you just extracted) found in the Main Skyrim Directory.
Ljoss ELFX Changes
Updated changes to Ljoss for Enhanced Lights and FX.
- Extract the contents of the archive to the Main Skyrim Directory
Monitor Setup
Making Sure You Can See the Prettier Pretties
Setting up HDMI Full Range:
SETTING UP YOUR MONITOR FOR BEST DISPLAY
If you are using an HDMI cable to connect your monitor and your GPU, you’ll need to make some adjustments in Windows. Look for your use case below and follow the instructions that go with them.
- Calibrate your monitor! This is a huge and important (not to mention relatively easy) step that a number of users forget. We highly recommend starting from How to calibrate your monitor to get a good color setup.
There are three use cases – use ONLY the one that matches your setup:
If you are using a NON-HDR capable PC Monitor:
- Right-click on your desktop and select the nVidia Control Panel.
- Select “Change Resolution” from the selections on the right.
- Scroll down and select “Use NVIDIA Color Settings”.
- Ensure that the Output Color Range is set to “RGB”
- Ensure that the Output Color Depth is set to “8-Bit”.
- Ensure that the Output Dynamic Range is set to “Full”.
If you are using a NON-HDR capable TV:
- Right-click on your desktop and select the nVidia Control Panel.
- Select “Change Resolution” from the selections on the right.
- Scroll down and select “Use NVIDIA Color Settings”.
- Ensure that the Output Color Range is set to “RGB”
- Ensure that the Output Color Depth is set to “8-Bit”.
- Ensure that the Output Dynamic Range is set to “Limited”.
If you are using an HDR capable Monitor/TV:
- Right-click on your desktop and select the nVidia Control Panel.
- Select “Change Resolution” from the selections on the right.
- Scroll down and select “Use NVIDIA Color Settings”.
- There are three setting that need to coordinate. In order of preference, set your Output Color Format / Output Color Depth / Output Dynamic Range to one of the following:
i) RGB 10-Bit Full (requires relatively new hardware – may not be available).
ii) YCbCr 4:4:4 10-Bit Limited.
iii) YCbCr 4:2:2 10-Bit Limited.
iv) YCbCr 4:2:0 10-Bit Limited.
v) RGB 8-Bit Full - Verify that the refresh rate and resolution remain unchanged. If they changed, you may need to shift to the next lower preference in (d) above.
- Ensure that the HDR setting in Windows is DISABLED. This can be located by doing a search in Windows Settings.
Anti-Virus Settings
Defending You Against Defender
Windows Defender and other AntiVirus Software are known to interfere with many of the tools from the guide. It is strongly advised that you add folder and process exclusions for ALL TOOLS and for MOD ORGANIZER 2, as well as a file type exclusion for ".NIF" files. The process shown below is for Windows Defender - if you use any other AV program, you will need to figure out the equivalent version of these instructions on you own.
How to add a process exclusion to Window Defender:
- In the Windows Search Bar, search for Virus & Threat Protection.
- Under Virus & Threat Protection Settings click Manage Settings.
- Under Exclusions, click Add and Remove Exclusions.
- Click the Add An Exclusion button.
- From the drop-down menu click Process
- In the popup window under Enter Process name add the file path to the .exe you wish to exclude.
- For example, DynDOLODx64 on my system would be:
J:\Skyrim Special Edition Tools\DynDOLOD Alpha 39\DynDOLODx64.exe
- For example, DynDOLODx64 on my system would be:
- Run through steps 4-6 for:
- DynDOLODx64.exe
- TexGenx64.exe
- xLODGENx64.exe
- Cathedral_Assets_Optimizer.exe
- Do the same for the copies of Texconvx64.exe in your ...\DynDOLOD\Edit Scripts and ...\xLODGen\Edit Scripts folders.
- Add a folder exclusion for your MO2 folder and your Tools folder(s). It's the same steps as above, but choose 'Folder' instead of 'Process'.
- Add a file type exclusion for
.nif